TopMenu

Hosting Asp.net vNext application on Linux server on Azure

Note: This post is outdated and not applied to current version of Asp.net DNX version. 
In this tutorial we’ll see how to host Asp.net vNext application on Linux server image running on Azure. In order to follow the steps firstly you need to have Microsoft Azure account. The supported Linux version is Ubuntu snappy.
Login to the http://portal.azure.com/ to access your Azure account. In this article I’m using the newly launched azure portal which is having blades to support multi-view in one window. We’ll start with creating a new Linux VM on Azure and then configuring it for Asp.net vNext hosting.
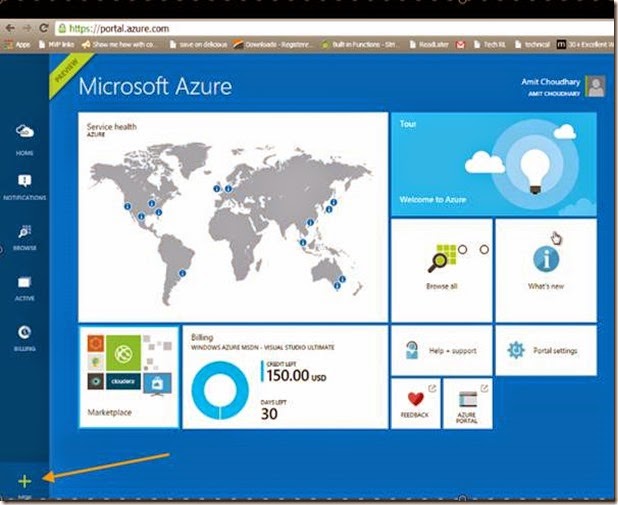
clip_image002
Step 1: Click on New and select Ubuntu
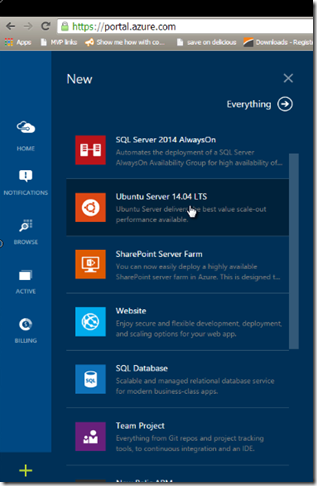
clip_image003
Step 2: Specify the required details for the new Linux server details.
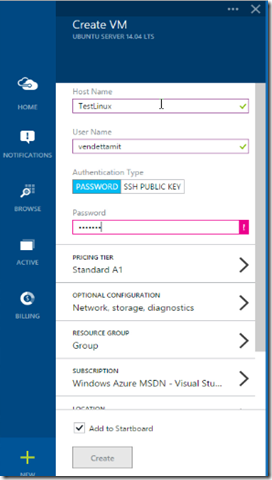
clip_image004
If all details are correct and filled the Create button will get enabled. Click on Create the VM will start initializing, allocating respective resource for the Linux VM. This process will take 10-15 minutes to finish.
image
You’ll get something similar view of created Linux machine. If you click on Settings then Properties you can get the DomainName with other details. This domain name will be used as machine name to connect via remote client.
Step 3: Once the VM is created, Next step would be to connect with the Linux server. If you’re on windows you can use the Putty tool to connect to server console. Here are few quick steps to connect to the Linux VM.
i) Launch the Putty tool and enter the domain name of the created machine.
image
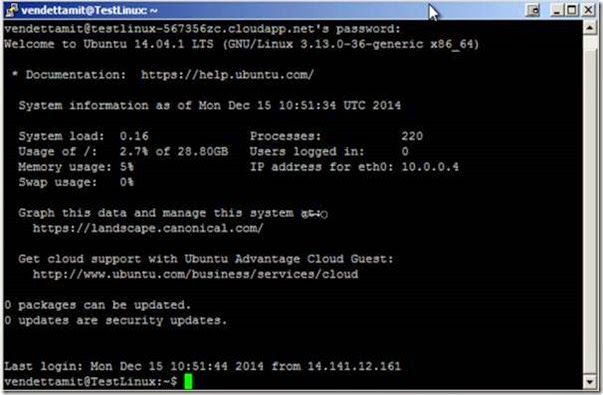
ii) Once you click open, if the domain name is valid a command window will open asking for Username and password. Enter the details and Linux machine will be connected and ready to receive the commands.
clip_image009
Step 4: Now you’re connected with the Linux server. To get the server ready now we need to install components to have the .Net core installed on the server. For Linux machine the .Net core is supplied with in MONO project from Xamarin and contributors. To check if the Mono is installed run following command.
 

Mono --Version 

clip_image011
Ofcourse the Mono is not installed on the server so we need to install it. Run following commands to install the Mono.
Note:- You can try downloading the mono-runtime with suggested command. But I’m not sure if that will give the fully featured Mono on the Linux. I haven’t tested it.

Downloading required tools:


sudo apt-get install make 

sudo apt-get install git autoconf libtool automake build-essential mono-devel 

gettext zip mono-complete unzip 


Downloading Mono and compile it. Run following command in order to get the latest Mono version ready to Install.


PREFIX=/usr/local 

PATH=$PREFIX/bin:$PATH 

VERSION=3.10.0 

wget http://download.mono-project.com/sources/mono/mono-$VERSION.tar.bz2 

tar -xjvf mono-$VERSION.tar.bz2 

cd mono-$VERSION 

./autogen.sh --prefix=$PREFIX 

make 

make install 

These steps will take more than 30 minutes to downloading, compile and Install the Mono.
Now we have to install few more components like NPM, Git, KVM, and K Runtime with Kestrel server. Before download and installing these components few ssl certificated would be required to add to the certificate store of the machine. With this step the downloading of required Nugets will not take place and will give missing certificate error.

Installing certificates:


sudo certmgr -ssl -m https://go.microsoft.com 

sudo certmgr -ssl -m https://nugetgallery.blob.core.windows.net 

sudo certmgr -ssl -m https://nuget.org 

sudo certmgr -ssl -m https://www.myget.org/F/aspnetvnext/ 


To avoid few certificated which falls under untrusted certificates run following command:


mozroots --import –sync 

Installing KVM on server 


Run following commands in order to download and install the Kvm.


curl -sSL https://raw.githubusercontent.com/aspnet/Home/master/kvminstall.sh 

| sh & source ~/.kre/kvm/kvm.sh 

source /home/punitganshani/.kre/kvm/kvm.sh 

kvm upgrade 


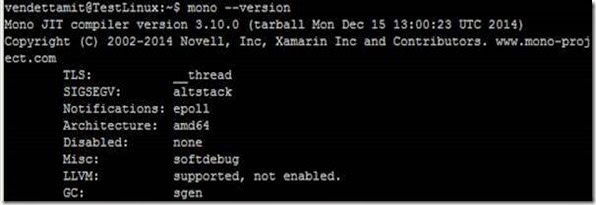
Now check the Mono version again:


Mono –Version 
clip_image013
Note: If you don’t see the version 3.10.0 of Mono then repeat the above steps for installing the Kvm again. Because only this version is supported for Kestrel server that hosts the Asp.net vNext application.
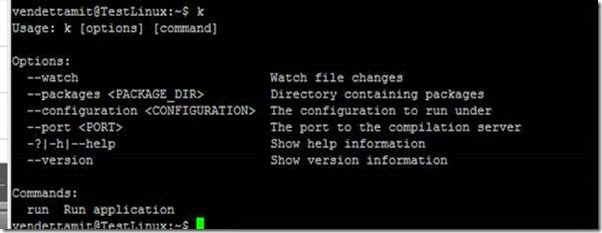
Now to verify if the K Runtime is installed Run “k”.
clip_image015
Installing Kestrel server
To install the Kestrel server run following commands:


sudo apt-get install npm 

npm install -g grunt-cli 

npm install kestrel-server 


Now we need a sample application so that we can test the installed components. We’ll be using the Asp.net starter application from github.
Run command:


git clone http://www.github.com/aspnet/home.git 

clip_image016
Navigate to the following directory hierarchy:
Home -> samples -> HelloWeb
After navigating run following command:


kpm restore 


kpm build 


If there’s no error in restoring nuget packages and building the application then application is ready to Host.
Run following command to host the application in Kestrel server:


k kestrel 

You might get following error:
System.NullReferenceException: Object reference not set to an instance of an 
object at 
Microsoft.AspNet.Server.Kestrel.Networking.<strong>Libuv</strong>.loop_size 
() 
[0x00000] in &lt;filename unknown&gt;:0 at 
Microsoft.AspNet.Server.Kestrel.Networking.UvLoopHandle.Init 
(Microsoft.AspNet.Server.Kestrel.Networking.Libuv uv) [0x00000] in 
&lt;filename unknown&gt;:0 at 
Microsoft.AspNet.Server.Kestrel.KestrelThread.ThreadStart (System.Object 
parameter) [0x00000] in &lt;filename unknown&gt;:0 


For Web Applications, we need KestrelHttpServer which is built on libuv library.


wget http://dist.libuv.org/dist/v1.0.0-rc1/libuv-v1.0.0-rc1.tar.gz 

tar -xvf libuv-v1.0.0-rc1.tar.gz 

cd libuv-v1.0.0-rc1/ 

./gyp_uv.py -f make -Duv_library=shared_library 

make -C out 

sudo cp out/Debug/lib.target/libuv.so /usr/lib/libuv.so.1.0.0-rc1 

sudo ln -s libuv.so.1.0.0-rc1 /usr/lib/libuv.so.1 


Now runt the command again:


k kestrel 

It should say “Started” at this time.
clip_image017
The application is hosted at localhost:5004 (default port for Kestrel server). It can be changed from project.config file.


Exposing hosted website:


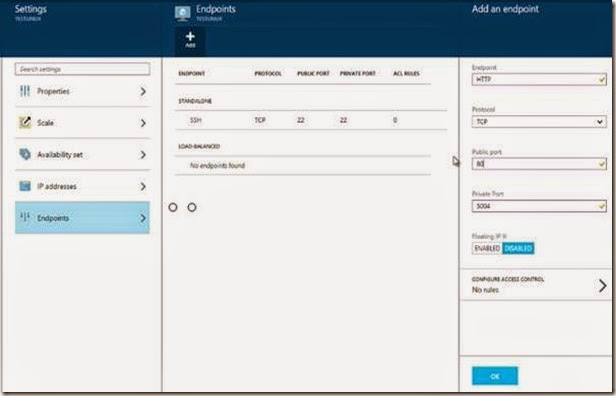
Now to expose the hosted site to external world last thing is to add an Endpoint on your Linux machine via Azure portal. To add the Endpoint go back to the Azure portal select the Linux VM -> Click Settings -> Endpoints -> Add.
clip_image019
Fill the details. If all the End points details are valid, click Ok. Now your machine is ready to show the hosted Asp.net vNext starter application to external world.
Now open browser on local machine. Goto http://<your domain name>
e.g. http://testlinux-12345c.cloudapp.net/
… And you’ll your hosted started application.
image


Building Hosting Asp.net vNext app on Macbook

Note: This post is outdated and not applied to current version of Asp.net DNX version. 

In previous post we have learned how to start using the new Asp.net 5 hosting environment named “K” without using IIS. In this article we’ll learn how to start developing Asp.net web application on Macbook. As Microsoft announced the OSS of .Net technologies mean one should be able to contribute/create/host apps across platform including Linux, Max and Windows.

Background

The overview of developing and deploying cross platform of Asp.net web app really exciting thing coming with vNext. One can develop and deploy on any platform they want. I tried to create a picture representing Idea of cross platform develop/deploy.
image
In above picture the interesting part is Azure gives you an opportunity to create Linux based Virtual Machine. And visual studio enables the deployment and hosting your Asp.net Web app directly from new Visual Studio 2015. Isn’t it interesting?

Get started

Let start with instructions of how to create/run Asp.net on a Mac machine. Though all the steps are already specified on Asp.net github page but to give you more clearer picture of steps with screenshot would definitely help one to step ahead having hands on.
To install KVM (Kruntime** Version Manager) and the correct version of Mono on OS X using Homebrew follow the following steps:
**Note: Kruntime is code that bootstraps and runs an ASP.NET vNext application. This includes things like the compilation system, SDK tools, and the native CLR hosts.
Step 1 -
Install Homebrew if it is not already installed.
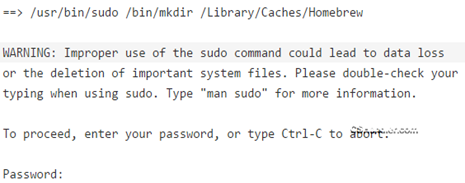
Run following command on terminal to install Brew via terminal:
ruby -e "$(curl -fsSL https://raw.githubusercontent.com/homebrew/install/master/install)"
image
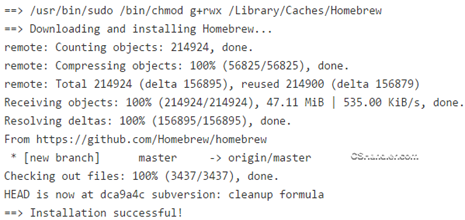
Here you need to press Return key. You’ll see following output:
image
Here you need to insert the password of user you logged-in with.(Make sure user have Administrative rights). Also the cursor will not show you anything when you type password so just type and press Return key and the homebrew will be installed on your machine.
image
Step 2:
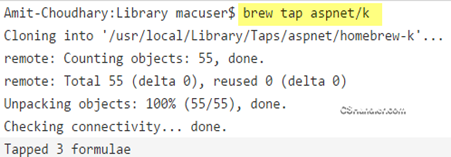
Run command brew tap aspnet/k to tap the ASP.NET vNext related git repositories. If you had already tapped the repo for previous releases, run brew untap aspnet/k to delete the old commands and tap again to get the updated brew scripts.
 image
Step 3:
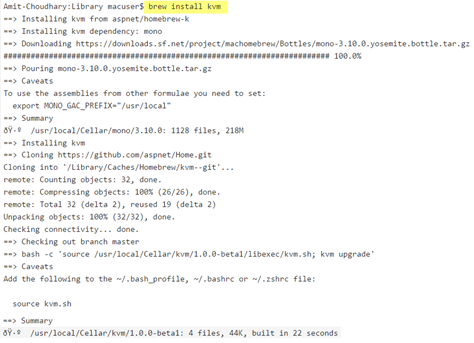
Run command brew install kvm to install KVM. This also automatically install the latest KRE package from https://www.nuget.org/api/v2 feed.
image
Step 4:
Run command source kvm.sh on your terminal if your terminal cannot understand kvm.
Step 5:
Run command kvm upgrade. This will install the latest version of Kruntime. Now you’re ready with your Kruntime to host and run Asp.net vNext apps. Now to start with creating applications you would need an Editor. In this tutorial I’m going to use the Sublime Text 3. Download and install if it’s not already install on your macbook.
Step 6: Setting up Asp.net and C# plugin for Sublime
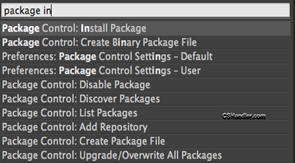
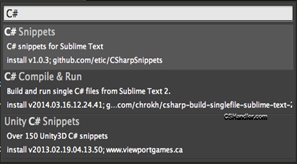
Omnisharp have developed many plugins for several famous editors for various platforms. So in order to setup an development environment I have to install the Omnisharp plugin for Sublime. Follow the instructions to make the sublime Asp.net and C# development ready with similar experience as we have in Visual studio.
imageimage
Step 7: Getting a solution ready in Sublime text editor.
If you want to start with creating a fresh .Net solution then follow the blogs post here. The post will show you how to create a sublime project and convert it into the Asp.net vNext project.
In this post I’ll just use the sample solutions which are already there on Asp.net home branch to save some time for me and you. Install Github for OSx if it’s not already installed. Now clone the home branch from the terminal by running the following command:
image
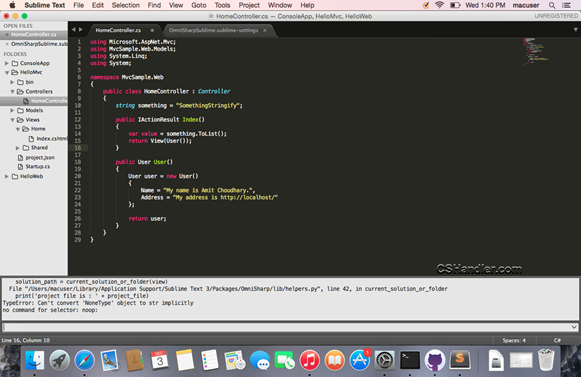
Open the project Hello Mvc in the Sublime to check if your color scheme, Language and Intellisense settings are done correctly.
SNAGHTML3e04c94c
Step 8: Building and Restoring the nuget packages of downloaded samples
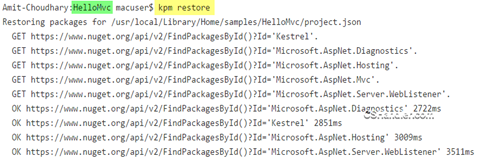
Run kpm restore command from terminal. This will restore the nuget packages required to build the project. Make sure you navigate to the directory where the project resides before running the command.
image
Now your first sample web is ready to host and run on Mac.
Step 9: Hosting and running sample web
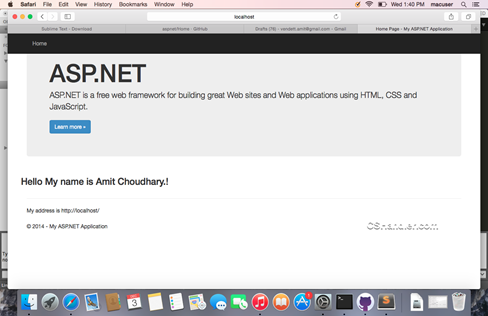
Run command k kestrel. This command will build and host the Asp.net web app on mac. The default port where the application will be running is http://localhost:5004. This is configuration from project.config file. I’ll be writing another post about the new Asp.net vNext project structure and configurations.
image
SNAGHTML3e1b87da
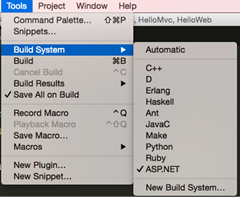
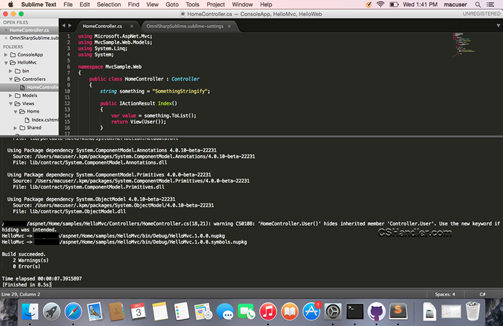
If you see any build errors in code you can open the web application in Sublime editor and fix the build errors if there are compilation errors. To build the Asp.net from web first change the setting in the Project menu item. Change the Build System to Asp.net.
image
Fix the compilation errors and build the project using command + B.
SNAGHTML3e1f4eb2
That’s all. Happy coding!!!
If you have any questions/doubts or feedback about the article feel free to drop comments below.

Get Started with Asp.net5 vNext on Windows

Note: This post is outdated and not applied to current version of Asp.net DNX version. 

This is my first time experience with Asp.net 5. I’m excited about the new open source .Net CLR. The promise from Microsoft is to use new technology without affecting the current environment of .Net is quite impressive. So we’re going to talk about it how it works. This post will be a startup for people who wants to start with Asp.net 5 application. Just to get impressed what did they do? How did they do it? It will come with my another post so keep an eye.
What is next
As the title says, The post is about the Asp.net vNext on windows so though it’s open source but in this post I’ll cover only windows platform.
First of very all we need to know the terminology. Here are few:
  • K
  • KVM
  • KPM
These are the terms or more of commands we’re going to use throughout this blogpost.
Run the following script via powershell. Make sure you are running the poweshell with Admin privileges.
powershell -NoProfile -ExecutionPolicy unrestricted -Command "iex ((new-object net.webclient).DownloadString('https://raw.githubusercontent.com/aspnet/Home/master/kvminstall.ps1'))"

In the original documentation it has @ at the start but you need to remove it to make it run.

Now run the command prompt and try running kpm command. This will not say the command doesn’t exist but it’ll show you the help menu of kvm command.

Now try running KVM List on the command prompt it won’t show a result if you’re running it first time. Don’t worry run following command:

KVM UPGRAGE

It’ll install the latest KRE and K platform on you machine. Still you’re far away to get the latest open source .Net CLR. ;) Download the latest samples for Asp.net 5 sample application or clone it via GitHub. https://github.com/aspnet/Home

Run the command prompt and go to the application directory of downloaded samples. and Run the command “K Run” or “K Web” depends on what kinda of application you have in sample application collection.

I promise to have separate dedicated blog on explanation of K platform. but this time we’re just going to experience the free world of open source .Net. No Installation but just developer experience.

Run following command in the sample application via command prompt:

KPM RESTORE

It’ll restore the required Runtime or call it .Net CLR for you application. Now just a step left to take.

K Run

K Web

Depends on your application if it has Main or if It’s a web application. You’ll see the console messages or just a mesasge “Started” after launching the command.

If it’s a console application you’ll see console message on the same command prompt otherwise if it’s a web it’ll just say “Started”. Now go to “http://localhost:5001” to access the hosted application. This is a default port and it’s configurable.

This is the first step to start with we’re gonna rest of the world in my upcoming posts.

AppDomain and Dynamic Assemblies

I have been working on an application where there was a requirement to compile and create dynamic assembly. But since there was a lot of request has to be processed various/multiple requests for code compilation on the fly and generating assembly has to be entertain. I realized that generated assemblies remained in the memory which was a problem and could have result in out of memory issues if placed in the production.

Note: The Roslyn libraries are being used for the compilation for generating assemblies.

Requirement statement:

Compile the code at run time and load the generated assembly to run some tests against the generated assembly.

As I mentioned in introductory part, the assemblies were not unloading once the work was finished. Ofcourse the assemblies loaded in the AppDomain were only gets unloaded once the Appdomain is unloaded. Then I thought of understand the AppDomain rather just placing a plumbing code for the problem and so I came to wrote this blog.

AppDomain - The Definition stated by MSDN:

Application domains provide an isolation boundary for security, reliability, and versioning, and for unloading assemblies. Application domains are typically created by runtime hosts, which are responsible for bootstrapping the common language runtime before an application is run.

One thing that can be noted here is,

You must load the assembly in appdomain before executing it’s methods.

Perform the operation for execution of the logic in separate AppDomain.

Unload the assembly.

Note: If you’re creating an AppDomain with in a method then once the AppDomain is created it will be loaded over the CurrentApplication domain and the local variable defined or initialized in parent domain won’t be accessible to the new AppDomain.

But this problem can be solved by using the MarshalByRef. The MashalByRef is being used to make the objects of a class available across the boundary of the AppDomains. So in my case I had to mark the shared classes between the parent and child AppDomain as MashalByRef for sharing. One more important thing the class must be marked with Serializable.

How to create a custom Domain?

Below is the snippet to create an AppDomain with full security permission for local machine.

How to find currently loaded domains?

To check if your custom AppDomain is created, In Visual studio add a breakpoint in your application, Go to menu Debug -> Windows -> Modules.

clip_image002[4]

As shown in the above picture, there are three different AppDomain are loaded in the Module. The one with the GUID as name is my custom domain I created as ofcourse it’s an service hosted in IISExpress.

You can have question right now in mind, how can I get to know which domain is my current domain?

Answer, Trace.WriteLine(AppDomain.CurrentDomain.FriendlyName);

That’s it. It will show the currently loaded domain in the application.

What’s next?

Now, I had my custom domain loaded. To execute the desire method or logic I would need to get access to the assembly and invoke the method via reflection.(Though it will have some considerable performance issues).

Sample code:

That’s it once the job is finished I can unload the domain using following code.

That’s it. It solved my problem and ofcourse I get to know the benefits of Application Isolations in AppDomain.

But there are some things that can be considered into account. Any exception occurred in the custom appdomain will not be propagated to the parent appdomain. As a solution you can create a custom exception and mark it as Serializable as shown in this thread.

Self Hosting OWIN and Asp.net WebAPI

In this fourth blog post of the OWIN and Katana series, we’ll be discussing about the various hosting options available for Katana. As the OWIN specification said the server and host are separated so we can use a list of types of host to host the OWIN middleware i.e. Katana. The application will be working in a normal hosting environment.

Warning: - This article is valid with the version of Microsoft.Owin.SelfHost 2.1.0.

Let’s first discuss why Katana was provided with the various hosting types. In legacy framework of Asp.net the only available option was using System.Web or IIS. We have already seen the Hosting of Katana in the IIS in our previous posts.
In the initial phase of releases the Katana was supposed to support the following hosting types:
1. Asp.net IIS hosting pipeline
2. Owin self host

First we’ll discuss how to start a self host for OWIN. As the new release are coming for the Katana the more it’s becoming a more charming and easy to use in a way of usability. The documentation MSDN i.e. Asp.net website is outdated. So I've placed a disclaimer in the start of this article too ;)
Let’s fire up the VisualStudio and Add a new project -> Console Application.
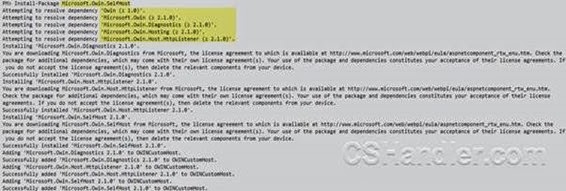
Install the pre-requisite –

Install-Package Microsoft.Owin.SelfHostclip_image002

Now we need Startup.cs class that would be identified as Configuration setup class. The naming is important for this class and should be named as Startup. If you’re interested in knowing detection of Startup for OWIN read this post OWIN Startup Class detection.

Here’s the supplementary package for you.

public class Startup
{
    public void Configuration(IAppBuilder appBuilder)
    {
        // Those who are familier with HttpContext, owinContext is just a brother from another mother.
        appBuilder.Run((owinContext) =>
            { 
                owinContext.Response.ContentType = "text/plain";
 
                // here comes the performance, everythign in the Katana is Async. Living in the current century.
                // Let's print our obvious message: :)
                return owinContext.Response.WriteAsync("Hello World.");
            });
    }
}

For more options -


Install-Package Owin.Extensions


This will provide you lots of extension method with various options to invoke the Usage, StageMarker, Map functions. Go as you like.
Now let’s add some code in the Main function to start the code.


public static class Program
{
    public static void Main(string[] args)
    {
        const string baseUrl = "http://localhost:5000/";
 
        using (WebApp.Start<Startup>(baseUrl))
        {
            Console.WriteLine("Press Enter to quit.");
            Console.ReadKey();
        }
    }
}
Now you’re ready to roll. Run the console application hitting F5 in visual studio and you’re on.
clip_image003
Let’s launch the browser and check the Url where we have our host available for serving:
clip_image004

There it is. No IIS, No System.Web, Individual recipe for you.
Now let’s do something interesting. The Katana is best support for SingalR and WebAPI until now because both of these technologies are completely independent of System.Web i.e. Asp.net IIS.
To host an WebAPI in our custom host just follow below steps:
Install the pre-requisites –


Install-Package Microsoft.Aspnet.WebApi
clip_image006Now ofcourse you need to create a WebAPI controller. So let’s do that:


public class TestController : ApiController
{
    public int[] GetValues()
    {
        return new int[] { 12, 13, 14, 15 };
    }
}


That’s not all, It’s all about Nuget don’t leave the cart we’re still travelling to the shore.
Install the WebAPI support via Nuget:


Install-Package Microsoft.AspNet.WebApi.Owin


Now go back to the Startup.cs and add few configuration that, ofcourse, required to start an WebAPI.


public class Startup
{
    public void Configuration(IAppBuilder appBuilder)
    {
        // Setup WebAPI configuration
        var configuration = new HttpConfiguration();
 
        configuration.Routes.Add("API Default", new HttpRoute("{Controller}"));
 
        // Register the WebAPI to the pipeline
        appBuilder.UseWebApi(configuration);
 
        // let's keep the old stuff too.... 
        // Those who are familier with HttpContext, owinContext is just a brother from another mother.
        appBuilder.Run((owinContext) =>
            { 
                owinContext.Response.ContentType = "text/plain";
 
                // here comes the performance, everythign in the Katana is Async. Living in the current century.
                // Let's print our obvious message: :)
                return owinContext.Response.WriteAsync("Api is availble at:  /Test");
            });
    }
}


So let's open the default page that will serve the Normal http content:
image
I have used simply the controller name to invoke the WebAPI controller function. Which make sense for the demo. Now let’s try this in Chrome not in i.e. Because it will ask you for action to save the Json format file. Our url will be http://localhost:5000/Test.
clip_image008
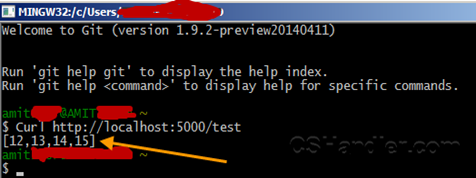
But this not JSON right? OK, I’m gonna give an interesting tip to open any WebAPI method that returns a JSON. If you have Git Bash installed, then Launch it and run following command Curl with Url of your WebApi url. This supports invoking any Web http request that gives JSON in response in a formatted result as output.
clip_image009

Hope you would love this way to get the JSON in a formatted way. So I enjoyed writing this article hope you enjoyed reading it too.
See you on the other side of OWIN. Give a holler :)