TopMenu

Designing and Creating REST services with WCF 4.0

I used to post answers in a .Net forum and many times I saw a question there What are ReST services, How to create a ReST service and that made me curious about it and I came to write this post. so very first of all I would like to Introduce the word ReST.

What is REST?

ReST is abbreviation of Representation State Transfer So I chose to write it like ReST rather than REST. It is an architectural style that focuses on resources and structured ways to access those resources via the web. It deals with sending data as XML message over the HTTP. Like SOAP it doesn’t hold Header, Body or Envelop to wrap the payload. Its more of URI based for e.g. such a service would be available to me at the following URI:http://host.com/ServiceDomainName/ServiceName. This is just an example.

Does it support the authentications and other security?

ReST services doesn’t keep any information like SOAP headers does. But the authentication can be implemented using the some customization in URI by embedding some Hashed security token in it. Common places/situations where ReST can be preferred to use:

  1. Where the service is not complicated, (i.e. no requirements of security and state)
  2. When high level of scalability/performance is needed. (ReST allows for caching to increase the scalability)
  3. Bandwidth is of importance and needs to be limited. (In SOAP we are passing a lot of extra data all the time, ReST allows for URI based identification of resources)
  4. ReST allows easy aggregation of services.

Designing ReST service

The ReST service itself have its development cycle. you don’t want to skip the designing phase if you’ve decided to use the ReST service in your application. This phase include a very important aspect of ReST i.e. Resource or Actor, URI templates. The first step in designing a ReSTful service is to identify the resources the service will expose. for e.g.

  • User
  • Notes

These two resources can be further manipulated for multiple operations that would help us designing the URI template later on. So the possible combination of these resources with operations could be:

  • Individual User
  • Individual User Profile
  • Individual Note
  • Collection of all public Notes
  • User’s Private Notes
  • User’s All Public Notes

Now the next phase would be the deciding and defining the design of URI template. So  considering the above resources we’ll have following URI in our ReST service:

Operations

Descriptive URI format

Individual User /users/{username}
Individual User Profile /users/{username}/profile
Individual Note users/{username}/notes/{noteid}
Collection of all public Notes ?title={title}
User’s Private Notes /users/{username}/notes?title={title}
User’s all Public Notes {username}?title={title}

Here we’ve used the ?title={title} just to filter specific notes by title rather than showing all notes as there could be number of notes in the record. This is all up to your designing strategy this was just to show you how to use the approach. I hope this would ensure you covering everything with their scope.

ReST can perform following operations using the HTTP interface:

HTTP Verb Operation Response Code
GET Retrieve {user}/{note} 200 (“OK”), 404(“Not Found”)
POST Create/Update {user}/{note} 200 (“OK”), 404(“Not Found”)
PUT Create/Update {user}/{note} 200(“OK”), 401 (“Unauthorized”)
DELETE Delete {user}/{note} 200(“OK”) means Successful, 401 (“Unauthorized”)

This is all information that would help you understanding the ReST first. For further detailed reading here is the MSDN white paper.

ReST in WCF 4.0

Now lets get started with some hands on exercise on ReST. To start with the ReST services development I recommend you to download and Install the WCF ReST template from Microsoft WCF team that’ll save your lots of time Download from here.

There you might be surprising that few files would be missing that you used to have in your simple WCF web service:

  • The .Svc File
  • An Interface Contract
  • Dozens of lines of configuration that you have to change to make your service work

other than the changes in the Web.configurations file there’ll be a Global.asax file that is having a code to handle the Request coming using the WebRoutine class of Asp.Net MVC.

If you have previously worked with WCF ReST services than you can clearly say the difference between the setting you’d used in web.config file. The new config file will look something like this in the WCF ReST 4.0 template:

image

The below code would be added Global.asax for request redirection

void Application_Start(object sender, EventArgs e) {     RegisterRoutes(); } private void RegisterRoutes() {         RouteTable.Routes.Add(new ServiceRoute("HelloService", new WebServiceHostFactory(), typeof(Service1))); }

so the url requesting the resource at http://localhost/wcfrest2/helloservice/ will send the request to the Service actually so you don’t need the .Svc file.

image

Since in the web.config file the standardEndPoint tag have helpEnabled=”true” so you can just use the help resource for your service to see all the available resources at possible URIs. Now What you have to is simply introduce the code in Service.cs file write a simple code to say hello

[WebGet(UriTemplate = "Message")] public string GetCollection() {     return "Hello there!! I'm a quick ReST message"; }

You can host the ReST service in IIS with easy steps. Just go to Project Properties –> Click on Web tab –> Check Use IIS –> Create Virtual directory. Make sure you are running the Visual Studio 2010 under Administrator privilege.

Now go to your service URL http://localhost/wcfrest2/helloservice/Message

image

See the HTML source of this page

image

This your ReST format of response came from the WCF service. So after reading this post you will be able to start designing and creating WCF ReST with VS2010.

Hope you enjoyed the ReST show. Please leave comment of suggestions/questions. Smile

What is Lambda Expression? A simple guide For beginners

Whenever we talk about LINQ then everything related to LINQ comes as a part of discussion and so the Lambda Expressions are. Sometimes people ask the question about the Lambda Expression; It look so weird why should I use it in my code and what exactly it stands for? Developers who either from C++ or working on C# 2.0 are still not have clear vision of Lambda Expression. What are Lambda Expressions?, When & Where to use them? These are the basic question that can comes in mind when anybody heard of new programming things.
Through this post I'll try to answer these question. There are new terms are being introduced with every release of .Net framework so lets get started with Lambda Expression for now:

What is Lambda Expression?
Lambda expressions are similar to anonymous methods introduced in C# 2.0, except that lambda expressions are more concise and more flexible. All lambda expressions use the lambda operator =>, which is read as “goes to”. The left side of the lambda operator specifies the input parameters and the right side holds the expression or statement block.

Lets take an example:
delegate int anonymousDel(int i);
            anonymousDel myDelegate = new anonymousDel(
            delegate(int x)
            {
                return x * 2;
            });

            Console.WriteLine("{0}", myDelegate(5));

The segment inside the braces of anonymousDel is the also called as Anonymous Function.
Now lets convert it to Lambda Expression:
anonymousDel myDelegate = x => x * 2;

x => x * 2 is the Expression that is known as Lambda Expression. All lambda expressions use the lambda operator =>, which is read as "goes to". The left side of the lambda operator specifies the input parameters (if any) and the right side holds the expression or statement block. The lambda expression x => x * 2 is read "x goes to 2 times x." This reduced the no. of line as you can see and the output is still the same.

The above expression can be generalize for clear understanding.
(input parameters) => Expression;
and can be termed as "Expression Lambdas" since single Expression is involved here.
A Lambda Expression can contain multiple statements and can be surrounded by { } just like anonymous functions.
(input param1, input param2) => { statement1, Statement 2};
For e.g.
anonymousDel2 getBigInteger = (x, y) => { if (x > y) return x; else return y; };
Console.WriteLine(getBigInteger(10,15));

You can raise a question here how x & y are being treated as integer while you didn't declared them as integer?
Here is the answer, When writing lambdas, you often do not have to specify a type for the input parameters because the compiler can infer the type based on the lambda body, the underlying delegate type, and other factors as described in the C# Language Specification.
Anonymous function that take no parameter and return nothing can be written in form of Lambda Expression like below:

delegate void doSomething();
           
doSomething IamVoid = () => { Console.WriteLine("Hello there! I take nothing and return nothing"
); };
           
//call the Anonymous function
            IamVoid();

When & Where to use Lambda Expression?
Whenever you came to know about new term and you already know what it is then directly ask yourself when & where it would be used. The Lambda Expressions can be used to  simply replacing the Anonymous functions, In the LINQ query methods, or any where you need to intialize Generic delegates.
LINQ Query example:

LINQ to Objects

int[] numbers = { 5, 4, 1, 3, 9, 8, 6, 7, 2, 0 };
           
int oddNumbers = numbers.Count(n => n % 2 == 1);

LINQ to SQL
Customers.Where(c => c.City == "London");

LINQ To XML
var xml1 = element.Descendants("customer").Where(cust => cust.Attribute("id").Value == CustomerId).SingleOrDefault();

OTHER
Func<>, Action<> and Expression<> are the new generic delgates where you can use Lambda Expressions. Don't panic with these new terms Lets take example where are these new generic delegates can be used.

Look at the below code snippet:

delegate int anonymousDel2(int a, int b);
anonymousDel2 getBigInteger = (x, y) => { if (x > y) return x; else return y; };
Console.WriteLine(getBigInteger(10,15));

Lets modify the above code snippet using generic delegates and Lambda Expressions
Func<int, int, int> getBigInteger = (x, y) => { if (x > y) return x; else return y; };
           
Console.WriteLine(getBigInteger(10,15));

Explanation of Func<int, int, int> would be Func<parameter1, parameter2, returntype>
you can pass any number of argument but last mentioned type would be the type of returned value. Similary we use Action<param1, param2> in this we don't need to return any value. It denotes the Generic delegate here that have return type void. These delegates are introduced to provide the taste of Functional Progamming in the C# itself. if you are still interested in further reading then its worth for me writing this post.

When to use Lambda Expression?
Use whenever you feel reducing your line of code. Keep in mind the code maintainability while reducing the number of code lines. People think Lambda Expression as awkward looking code, But I'm telling you its worth using them in code wisely and once you understood the concept you'll fall in love using them. If you are going to use Excess of LINQ in your code then Lambda Expression will be your favorite buddy helping you wrap your code logic in few lines or may be Inline.

Hope you enjoyed reading this. Thanks for you time please leave comment for any question/suggestion.

Easy Steps to URL Rewriting in Asp.Net 4.0

Since SEO comes into consideration it becomes the part of web development. These days every website being developed should be optimized to some extent so it could get crawled by Search Engines.Its advisable that you should take care of your URL’s rather than showing them in a raw format make them readable by user as well SEO friendly.
URL is the important part that search engines want to take a look before they crawl the pages of your website. There are enormous open source libraries and ISAPI filter available that provides support to help you rewriting your URLs. The SEO and url rewriting is now taken into account and is introduced a supported extension for IIS 7.0/7.5 by providing URLRewriterExtension. But here we’re going to discuss how you can rewrite you URL in your Asp.net website with just 3 steps.

1. Create a Route path entry in RouteCollection
First of all add below code your to you Global.asax file. you can add as many route as you want to the RouteCollection object.

image

2. Create a class specific to the particular section that implements the IRouteHandler interface
to handle the incoming Route and receiving the data from the URL

image

3. Finally get into the Asp.net web form and process the request
span style="font-family: 'Courier New';">protected void Page_Load(object sender, EventArgs e)
 {
 int catid = Convert.ToInt32(HttpContext.Current.Items["catid"]);    
 var product = awe.Products.Where(item => item.ProductSubcategoryID == catid);             GridView1.DataSource = product;

 GridView1.DataBind(); 
}
You can download the complete source code of this post from here
Article Source  Code


Thank for giving your time reading this post. Please leave a comment for any questions/suggestions. :) 

Migrate to .Net 4.0 with new feature In Proc SxS

.Net framework is constantly upgrading to its subsequent versions starting from 1.0 to latest 4.0 version. The versions were released in a way that I could provide maximum support for libraries with a powerful run time. After release of .net 2.0 version other release of CLR was layerCaked on the existing framework. The term “layercake” model is used for these releases – in which version 3.0 added functionality on top of version 2.0, and version 3.5 on top of 3.0, without changing much functionality underneath.

image

The .Net 4.0 was the major release keeping in mind to cover all the missing support in the earlier versions. The problem that was faced at the earlier releases was because of installation of new release over the existing one. All the office application start using the latest installed version rather than using the existing one. so the plugins created on earlier framework start causing the problem since the change in runtime was seems to un-supportive to the code written in the old framework. Main problem identified was the due to change in the Thread model from 1.1 to 2.0 so the application created in 1.1 version causing the problem of Racing conditions as the Thread starts too early in the 2.0.

Threading problem was one of them that causing the problem after installing the latest version. But this problem is solved with the release of .Net 4.0. Framework supports the In process side by side execution of all the runtime that needed by the host process(Here host application is referred to the Office application e.g. Excel). So the installing .Net 4.0 version doesn’t make this runtime as default but it keeps the older version in memory so that older version plugins or libraries don’t start giving up.

image

The diagram provides an introduction to in-process side by side. In-proc SxS(In Process Sided by Side Execution) is an important part of keeping compatibility as the new versions change to support evolutionary needs, this is the best effort made by the Microsoft to provide highly backward compatibility.
The very common scenario that can be seen is both CLR 2.0 (.NET v2.0, v3.5 or v3.5) and CLR 4 installed. In this scenario, a managed application compiled against CLR 2.0 needs to run against CLR 4 and also needs to activate Managed COM Components compiled against CLR 4 side by side with Managed COM Components compiled against CLR 2.0 (or previous version). In this situation, an application configuration file needs to be included in the same directory of the managed application (EXE) with the following entry:
<startup>
<supportedRuntime version="v4.0.XXXXX" />
<supportedRuntime version="v2.0.50727" />
<process>
<rollForward enabled="false" />
</process>
</startup>
There can be many scenarios when the In-Proc SxS comes into picture with .Net 4.0 Common In Process Scenario and configurations are well explained here in below MSDN blog: http://blogs.msdn.com/b/clrteam/archive/2009/06/07/in-process-side-by-side-part-2-common-in-proc-sxs-scenarios.aspx

I came to write this post considering those people who are working on .Net 2.0 and looking for upgrading to the latest version. With the new features the .Net 4.0 would be the best version to choose for upgrade with its backward compatibility support. Thanks for you time reading this post Smile . please leave comments with your views.


Test your web application in all versions of IE including latest IE10 in one go by “IETestDrive”

Every web developer has to test his web application in all browsers. But what if you have to test your application in all version of IE consecutive versions IE5(believe me its still being used) IE6, IE7, IE8, IE9, Even on IE10(The latest one). So what people usually do they do install uninstall the later/earlier browsers or They use compatibility view but its available in from IE8 to later versions.

Recently, I found a great utility that could help you in previewing your web application in all versions, and it named as Internet Explorer Test Drive. If you are working on HTML 5 application then you can test your app for next coming IE10 platform preview that is available in this too. Click below link to visit and download the tool.

image

How to use the IETestDrive and its features:

Navigating Webpages

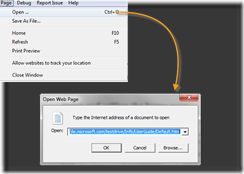
  1. Select Open from the Page menu or type Ctrl+O.
  2. The Open Web Page dialog box will always show the URL of the current page.
  3. Enter the Internet address (URL) of the Web page to which you wish to navigate.
  4. Alternatively, you may type the path of or browse for a file on your local computer.
  5. Click OK


Using and setting the home page

The default home page of the Platform Preview is the Internet Explorer Test Drive site, which you can use to see demos for and information about the new Internet Explorer platform. You can press F10 at any time to go to your home page.

To change your homepage, right click the Internet Explorer Platform Preview icon in the Start menu and choose Properties. In the Target field on the Shortcut tab add your home page URL to the end of the path. For example:

"C:\Program Files\Internet Explorer Platform Preview\iepreview.exe" http://www.bing.com

For 64-bit systems you will see (x64) in your application path:

"C:\Program Files (x86)\Internet Explorer Platform Preview\iepreview.exe" http://www.bing.com


Developer and Debugging Tools

The Platform Preview includes built-in Developer Tools. These tools help developers debug and understand the interaction between their sites and the browser. To open the Developer Tools, click the Debug menu and click Developer Tools, or press F12.

The status bar indicates when the page generates script errors. You can use the Developer Tools to get more information about and debug script errors.

For more information on the Developer Tools, go to the Internet Explorer Developer Center.

Document modes

You can force the Platform Preview into different document modes. To do this, click the Debug menu and select one of the Document Modes. You can also press Alt plus the numbers 5, 7, 8, 9 or 0 to select IE5, IE7, IE8, IE9 and IE10 document modes respectively (for example, Alt + 7 for IE7). You can press Ctrl + Alt + 0 at any time to reset the document mode to the page default. The current document mode is shown for the currently viewed page at the left of the status bar. Information on Document Modes is available on MSDN, as well as on our blog.

Common Keyboard Shortcuts

Below is a list of available keyboard shortcuts for use in the Internet Explorer Platform Preview:

  • Ctrl + O: Open a webpage

SNAGHTML112057d9

  • F5: Refresh
  • F10: Home
  • F12: Developer Toolbar
  • Alt + 5: Force IE5 rendering mode
  • Alt + 7: Force IE7 rendering mode
  • Alt + 8: Force IE8 rendering mode
  • Alt + 9: Force IE9 rendering mode
  • Alt + 0: Force IE10 rendering mode

image

  • Ctrl + Alt + 0: Reset Document Mode to the page default
  • Ctrl +/-: zoom in and out
  • Alt + ?: Help
  • Ctrl + S: Save Webpage As…
  • Alt + /: About


Create Shortcuts to Common Pages

To simplify navigating quickly to pages you commonly use you can create shortcuts. To do so, copy the Internet Explorer Platform Preview icon on your desktop and paste it to your desired location. Right click the newly created shortcut and click the Properties menu item. Update the Target field on the Shortcut tab to start the Platform Preview with the URL of your choice, as follows:

"C:\Program Files\Internet Explorer Platform Preview\iepreview.exe" http://www.bing.com

The Platform Preview is a 32-bit application. As a result, it is installed in a different location on 64-bit systems. When updating the Target field for 64-bit systems, it should appear as:

"C:\Program Files (x86)\Internet Explorer Platform Preview\iepreview.exe" http://www.bing.com

You may also do this for the shortcut on the desktop.

Monitoring Resource Usage

The Internet Explorer platform takes advantage of your PC hardware to provide a great experience. To see how the Internet Explorer Platform Preview and other browsers utilize your PC we recommend downloading CPU, GPU, Memory and Disk utilities such as the Taskbar Meters . GPU meters are often graphics card specific, so you may need to contact your graphics card manufacturer.

Submitting Feedback

Microsoft encourage you to report any issues you find using the Platform Preview. Click Report Issue on the menu and select Send Feedback. You can follow the Send Feedback wizard to report any issues you find in the Platform Preview back to Microsoft. You'll find a list of known issues in the release notes.

I hope you will surely have fun with this IEPreviewTestDrive Smile

SystemTray and Progressbar in window phone 7 Twitter search application

Here’s another post about the Window phone 7. In this post we’ll create an Window phone that will utilize the System Tray progress bar for waiting while the work is being done in background. This application is simple twitter search application that I’ve already created back in silverlight post “Twitter search application”.

image

If you want to know more about the the SystemTray in window phone then Here is nice blog post by eugenedotnet.

Lets get start, Open the visual studio 2010-> New project –> Silverlight phone application.
Name it whatever you like and go to the MainPage.XAML. Design a UI like this:
image
Here is the markup for this:


<!--TitlePanel contains the name of the application and page title-->
<StackPanel x:Name="TitlePanel" Grid.Row="0" Margin="12,17,0,28">
    <TextBlock x:Name="ApplicationTitle" Text="" Style="{StaticResource PhoneTextNormalStyle}"/>
    <TextBlock x:Name="PageTitle" Text="Twitter" Margin="9,-7,0,0" Style="{StaticResource PhoneTextTitle1Style}
"/>
</
StackPanel>

<!--ContentPanel - place additional content here-->
<Grid x:Name="ContentPanel" Grid.Row="1" Margin="12,0,12,0">
    <ListBox Height="383" HorizontalAlignment="Left" Margin="12,201,0,0" Name="TweetList" VerticalAlignment="Top" Width="425">
        <ListBox.ItemTemplate>
            <DataTemplate>
                <Grid Margin="10">
                    <Grid.ColumnDefinitions>
                        <ColumnDefinition Width="Auto"/>
                        <ColumnDefinition Width="*" />
                    </Grid.ColumnDefinitions>
                    <Image Source="{Binding Image}" Grid.Column="0" Margin="3" Width="50" Height="50" Stretch="UniformToFill"/>
                    <TextBlock Text="{Binding Message}" FontSize="14" Margin="3" Grid.Column="1" TextWrapping="Wrap"/>
                </Grid>
            </DataTemplate>
        </ListBox.ItemTemplate>
    </ListBox>
    <TextBlock Height="30" HorizontalAlignment="Left" Margin="25,25,0,0" Name="textBlock1" Text="Search Twitter: " VerticalAlignment="Top" />
    <TextBox Height="72" HorizontalAlignment="Left" Margin="114,50,0,0" Name="txtSearchTerm" Text="" VerticalAlignment="Top" Width="323" />
    <Button Content="Go" Height="72" HorizontalAlignment="Left" Margin="114,108,0,0" Name="btnGo" VerticalAlignment="Top" Width="90" Click
="btnGo_Click" />
</
Grid
>


Now set the property for the SystemTray to Enable the ProgressBar and you can also set the opacity property to a value equal to or less than 1. Also you can set the Text property of the ProgressIndicator.


<phone:PhoneApplicationPage
  
.........
       ....
       ......
   shell:SystemTray.IsVisible="True"
   shell:SystemTray.Opacity=".8">
       
       
<shell:SystemTray.ProgressIndicator>
            <shell:ProgressIndicator IsIndeterminate="True" Text="Loading..." />
        </shell:SystemTray.ProgressIndicator
>


To make the ProgressIndicator visible in the code behind file of MainPage.XAML. Take care that you need to get the instance of systemTray progress bar indicator when the PhoneApplicationPage is completely loaded.


ProgressIndicator pi;
// Constructor
public
MainPage()
{
    InitializeComponent();
    Loaded +=
new RoutedEventHandler
(MainPage_Loaded);
   
}


void MainPage_Loaded(object sender, RoutedEventArgs
e)
{
    pi = Microsoft.Phone.Shell.
SystemTray.ProgressIndicator;
}


Now you can set the IsVisible property using the object pi to True or False. So we don’t need to discuss the code for sending the request to the Twitter and downloading the result as its already discussed Here.
Create a Tweet class that will work as Entity class to hold the searched tweets


public class Tweet
    {
       
public string Message { get; set
; }
       
public Uri Image { get; set; }
    }


here is the complete code for button click event.


ObservableCollection<Tweet> _tweet = new ObservableCollection<Tweet>();

///
<summary>
///
Go Button Event handler 
/// </summary>
private void btnGo_Click(object sender, RoutedEventArgs
e)
{
   
if (!string
.IsNullOrEmpty(txtSearchTerm.Text.Trim()))
    {
       
WebClient client = new WebClient
();
        client.DownloadStringCompleted +=
new DownloadStringCompletedEventHandler
(client_DownloadStringCompleted);

       
//Let's do our main job
        client.DownloadStringAsync(new Uri("http://search.twitter.com/search.atom?q="
+ txtSearchTerm.Text.Trim()));

       
//Show the indicator
        pi.IsVisible = true
;
        TweetList.ItemsSource = _tweet;
    }
   
else
    {
       
MessageBox.Show("Please enter some text to search"
);
    }
}


///
<summary>
///
EvenHandler for Asyn completion request
/// </summary>
void client_DownloadStringCompleted(object sender, DownloadStringCompletedEventArgs
e)
{
   
XDocument doc = XDocument
.Parse(e.Result);
   
XNamespace ns = "http://www.w3.org/2005/Atom"
;
   
var items = from item in doc.Descendants(ns + "entry"
)
               
select new Tweet
()
                {
                    Message = item.Element(ns +
"title"
).Value,
                    Image =
new Uri((from XElement xe in item.Descendants(ns + "link"
)
                                    
where xe.Attribute("type").Value == "image/jpg" || xe.Attribute("type").Value == "image/png" || xe.Attribute("type").Value == "image/gif"
                                     select xe.Attribute("href"
).Value
                                      ).First<
String
>()),

                };

   
//Remove last search if any
    if
(_tweet.Count != 0)
        _tweet.Clear();

   
foreach (Tweet t in
items)
    {
        _tweet.Add(t);
    }

   
//Hide the loading progress bar
    pi.IsVisible = false;
}


And you are done. Run the application and enter some term to search and press Go button. You will see the Loading message with some animation on top.


Note: Well, This is not serious not but make sure you are connected to internet to get the search result Winking smile.


image

And here’s the search results from twitter for the entered term.


image

I hope enjoyed this blog Smile Please leave a comment… if you like it.

State management in Window Phone 7

In the previous article we’ve seen the Application execution model [Read here]. Now in this post I’ve created an example that would show how to persist the data from being lost when user moves forward and comes back to the application using the State collection by handling the NavigatedFrom and NavigatedTo  events.

Lets start, Open the visual studio 2010 and create new project. Now select the template for Silverlight Application for Windows Phone. and click ok.

Note: If you are new to Windows Phone and want to start with it. [Here] is the  post for how to start with Windows Phone 7 development.


To Create a UI in the MainPage.XAML file like below you need aTextBlock, a ListBox and a TextBox control. This application is to show the list of your favorite football players and selecting any player would show you the details of that player in the Textbox.

[Keeping things Little simpleWinking smile]

image

Here’s the markup for this UI

  1. <Grid x:Name="LayoutRoot" Background="Transparent">
  2.     <Grid.RowDefinitions>
  3.         <RowDefinition Height="Auto"/>
  4.         <RowDefinition Height="*"/>
  5.     </Grid.RowDefinitions>
  6.     <!--TitlePanel contains the name of the application and page title-->
  7.     <StackPanel x:Name="TitlePanel" Grid.Row="0" Margin="12,17,0,28">
  8.         <TextBlock x:Name="ApplicationTitle" Text="Silveright Application" Style="{StaticResource PhoneTextNormalStyle}"/>
  9.         <TextBlock x:Name="PageTitle" Text="Sample App" Margin="9,-7,0,0" Style="{StaticResource PhoneTextTitle1Style}"/>
  10.     </StackPanel>
  11.     <!--ContentPanel - place additional content here-->
  12.     <Grid x:Name="ContentPanel" Grid.Row="1" Margin="12,0,12,0">
  13.         <ListBox Height="191" HorizontalAlignment="Left" Margin="62,40,0,0" Name="listBox1"
  14.                 VerticalAlignment="Top" Width="297" >
  15.         </ListBox>
  16.         <TextBlock Height="30" HorizontalAlignment="Left" Margin="9,6,0,0" Name="textBlock1" Text="Favorite Football Players:" VerticalAlignment="Top" Foreground="#FF9EFF4B"></TextBlock>
  17.                     <TextBox Height="74" HorizontalAlignment="Left" Margin="-3,255,0,0" Name="textBox1" Text="" VerticalAlignment="Top" Width="440" />
  18.     </Grid>
  19. </Grid>

Now, create view model for this UI that’ll hold the data that would be displayed on it and will update itself when required.

  1. [DataContract]
  2. public class ViewModel : INotifyPropertyChanged
  3. {
  4.     private string textboxText1;
  5.     private Person selectedPerson; // for selection from the listbox
  6.     ObservableCollection<Person> personList;
  7.  
  8.     public ViewModel()
  9.     {
  10.         //populate some sample data
  11.         personList = new ObservableCollection<Person>()
  12.             {
  13.                 new Person(){Name="Syed Mehroz Alam", Age=10, City="Delhi", Country="India"},
  14.                 new Person(){Name="Zinedine Zidane", Age=20, City="Marseille", Country="France"},
  15.                 new Person(){Name="Ronaldinho", Age=30, City="Porto Alegre", Country="Brazil"},
  16.                 new Person(){Name="John Smith", Age=40, City="Washington", Country="USA"}
  17.             };
  18.     }
  19.  
  20.     #region Properties
  21.     [DataMember]
  22.     public ObservableCollection<Person> PersonList
  23.     {
  24.         get { return personList; }
  25.  
  26.         set { personList = value;
  27.         NotifyPropertyChanged("PersonList");
  28.         }
  29.     }
  30.  
  31.     [DataMember]
  32.     public Person SelectedPerson
  33.     {
  34.         get { return selectedPerson; }
  35.         set
  36.         {
  37.             selectedPerson = value;
  38.             NotifyPropertyChanged("SelectedPerson");
  39.         }
  40.     }
  41.  
  42.     [DataMember]
  43.     public string TextBoxText1
  44.     {
  45.         get
  46.         {
  47.             return textboxText1;
  48.         }
  49.         set
  50.         {
  51.             textboxText1 = value;
  52.             NotifyPropertyChanged("TextBoxText1");
  53.         }
  54.     }
  55.     #endregion
  56.  
  57.     public event PropertyChangedEventHandler PropertyChanged;
  58.  
  59.     private void NotifyPropertyChanged(string property)
  60.     {
  61.         if (PropertyChanged != null)
  62.         {
  63.             PropertyChanged(this, new PropertyChangedEventArgs(property));
  64.         }
  65.     }
  66.  
  67. }
  68.  
  69. [DataContract]
  70. public class Person
  71. {
  72.     [DataMember]
  73.     public string Name { get; set; }
  74.     [DataMember]
  75.     public int Age { get; set; }
  76.     [DataMember]
  77.     public string City { get; set; }
  78.     [DataMember]
  79.     public string Country { get; set; }
  80. }

In the view model the selectedPerson property is created to keep the user’s selection in from listbox. The selected item’s details would be shown to the text box. Now bind the UI controls with the view model. Keep the DataContract and DataMember attribute on the Class and its members that needs to be save in the State collection. This will help in serialization of data. Now bind the ViewModel with the UI Main.XAML

  1. <ListBox Height="191" HorizontalAlignment="Left" Margin="62,40,0,0" Name="listBox1"
  2.                     ItemsSource="{Binding PersonList}"
  3.                 DisplayMemberPath="Name" SelectionChanged="listBox1_SelectionChanged"
  4.                 SelectedItem="{Binding SelectedPerson, Mode=TwoWay}" VerticalAlignment="Top" Width="297" >
  5.             </ListBox>
  6.             <TextBox Height="74" HorizontalAlignment="Left" Margin="-3,255,0,0" Name="textBox1" Text="{Binding TextBoxText1, Mode=TwoWay}" VerticalAlignment="Top" Width="440" />
  7.            

Now everything is set for the sample application. As per the Application execution model we have to handle the NavigatedTo and NavigatedFrom event with checking if user is launching the application first time or if user is coming back and keeping the track when user navigates away from the application. In case user navigates away from the page the NavigatedFrom save the ViewModel instance to state collection. In case user returns back use the custom boolean flag isNewPageInstance that would be true when the page constructor get executed. Based on that we’ll create new ViewModel instance otherwise retrieve the saved ViewModel from the State Collection if exists. Here’s the complete code for the MainPage.XAML.cs file.

  1. public partial class MainPage : PhoneApplicationPage
  2.     {
  3.         ViewModel viewModel;
  4.         bool isNewPageInstance = false;
  5.  
  6.         // Constructor
  7.         public MainPage()
  8.         {
  9.             InitializeComponent();
  10.             isNewPageInstance = true;
  11.         }
  12.  
  13.         protected override void OnNavigatedTo(System.Windows.Navigation.NavigationEventArgs e)
  14.         {
  15.             base.OnNavigatedTo(e);
  16.  
  17.             if (isNewPageInstance)
  18.             {
  19.                 if (viewModel == null)
  20.                 {
  21.                     if (State.Count > 0)
  22.                     {
  23.                         viewModel = (ViewModel)State["ViewModel"];
  24.                     }
  25.                     else
  26.                     {
  27.                         viewModel = new ViewModel();
  28.                     }
  29.                 }
  30.                 DataContext = viewModel;
  31.             }
  32.             isNewPageInstance = false;
  33.         }
  34.  
  35.         protected override void OnNavigatedFrom(System.Windows.Navigation.NavigationEventArgs e)
  36.         {
  37.             base.OnNavigatedFrom(e);
  38.             if (e.NavigationMode != System.Windows.Navigation.NavigationMode.Back)
  39.             {
  40.                 State["ViewModel"] = viewModel;
  41.             }
  42.         }
  43.  
  44.     }
Now handle the List selection changed event and update the textbox accordingly.
  1. private void listBox1_SelectionChanged(object sender, SelectionChangedEventArgs e)
  2. {
  3.     Person selectedPerson = (Person)listBox1.SelectedItem;
  4.     textBox1.Text = selectedPerson.Name.Split(' ')[0] + ", " + selectedPerson.Age + ", " + selectedPerson.City + "," + selectedPerson.Country;
  5. }

Now start the application and select any person from the list

image
Now press Start button from the Phone.
image
It will navigates away from the application letting it into the Dormant start now do something let say launch some other application
now press back button to get back to the application.
image
It’ll show you the last selection that you have made. Smile
Download the source code for this article