TopMenu

Basics of Caliburn Micro in WPF mvvm–Part II Binding

In the first part of the MVVM using caliburn micro with WPF we saw how to write the bootstrapper to setup everything for the caliburn micro library. Now in this part we’ll see how to start creating new pages in the application and how the binding and events are being defined using this small library project with power of MVVM.
Before we start I would recommend you to go through the previous article showing how to do setup. Once you done with the setup you can design the MainWindowView.Xaml file.
Naming Conventions in Caliburn micro
The caliburn micro built so that it can predict the view and viewmodel mapping just by the names. So if you view should be named like MainWindowView and your view model should be named as MainWindowViewModel. This way caliburn will automatically search for the view when loading the view model in the memory.
clip_image001
Designing MainWindowView
You can have multiple controls defined in your sample page. Let’s take the below as the sample view model
<Window x:Class="MainWindowView"

        xmlns="http://schemas.microsoft.com/winfx/2006/xaml/presentation"

        xmlns:x="http://schemas.microsoft.com/winfx/2006/xaml"

        Title="{Binding DisplayName}" Height="350" Width="525"

        WindowStyle="None" WindowState="Maximized" WindowChrome.IsHitTestVisibleInChrome="True" WindowStartupLocation="CenterScreen">

    <Grid>

        <StackPanel HorizontalAlignment="Center" VerticalAlignment="Center" Width="350" Height="50">

            <TextBox x:Name="SearchText" VerticalAlignment="Center" HorizontalAlignment="Center" FontSize="12" Height="24" Width="100" />

            <Button x:Name="Search"></Button>

        </StackPanel>

    </Grid>

Now here we have a button and textbox. Let’s see the code for the View model of this window the caliburn micro is doing to provide in a easy to write code way.

using System;

using System.ComponentModel;

using System.Windows;

using Caliburn.Micro;


using ILog = log4net.ILog;


namespace SampleApplication

{

    /// <summary>

    /// The main window view model.

    /// </summary>

    internal class MainWindowViewModel : Conductor<IScreen>.Collection.OneActive

    {

        /// <summary>

        /// The container.

        /// </summary>

        private readonly SimpleInjector.Container container;


        /// <summary>

        /// holds teh event aggregator

        /// </summary>

        private readonly IEventAggregator eventAggregator;


        /// <summary>

        /// The logger.

        /// </summary>

        private ILog logger;


        /// <summary>

        /// The searchText property.

        /// </summary>

        private string searchText;


        /// <summary>

        /// Initializes a new instance of the <see cref="MainWindowViewModel"/> class.

        /// </summary>

        /// <param name="container">

        /// The container.

        /// </param>

        /// <param name="eventAggregator">

        /// The event aggregator.

        /// </param>

        public MainWindowViewModel(SimpleInjector.Container container, IEventAggregator eventAggregator)

        {

            this.container = container;


            this.DisplayName = "Sample main window view model";

            this.eventAggregator = eventAggregator;

            this.eventAggregator.Subscribe(this);


            this.logger = this.container.GetInstance<ILog>();


            this.logger.Info("MainWindow view loaded");


        }


        /// <summary>

        /// Gets or sets the message.

        /// </summary>

        public string SearchText

        {

            get

            {

                return this.searchText;

            }


            set

            {

                this.searchText = value;

                this.NotifyOfPropertyChange(() => this.searchText);

            }

        }

        /// <summary>

        /// Search action

        /// </summary>

        public void Search()

        {

            MessageBox.Show(String.Format("Search is being performed for text {0}", this.SearchText));

        }

    }

}

So in the view model we have defined a property named SearchText and a void method named Search. Other setup we have done in the constructor of the MainWindowViewModel class.
Now here’s the magic start. You don’t have to write anything else so just press F5 and run the application.
You can ask question how the control on the view are bound to the property and the method is bound with the Click action of the button. Here’s the magic that happened behind the scene, We talked about the naming conventions if you look at the View then we have the Textbox named same as the property defined in the Viewmodel similarly the button have the same name as the Method. This is how the caliburn detects and map the property and method to the controls with their kind.
We’ll look at more advance stuff in upcoming posts on caliburn micro. So tuned in and happy programming.






Visual studio 2012 and .Net 4.5 expert development cookbook by Abhishek sur

Recently, I have been reading a book Authored by a friend Abhishek sur. He’s a dedicated community guy with great deep knowledge of .Net framework and C# language. So finally I got the chance to spend my time reading all recipes he made throughout the book. I found it of my interest so I would like to write some feedback on the same:

clip_image001

Audience the book is targeting -

I would say this book is for developers who are above level 200(Intermediate) and familiar with terms of .Net development as well the as the challenges they have faced during the development. Few recipes are providing the solution for the same. Chapter 5 page 272 (Weak even pattern) is showing how you can get rid of Memory leaks produced by strong coupling of subscriber and listener.

What the book is covering?

Taking the reader to the next level the book is Including the latest Visual studio 2012 features with .Net 4.5 framework capabilities. Also there are few chapters where Author is deep diving into the concepts behind the scenes. Chapter 2 (Basics of .NET Programs and Memory Management) is the very good example. This book is not taking you to the expert level of only one topic but to show you the diversity of development and how the new Visual studio and .net 4.5 helps you in various ways.

I found this book really interesting as every next chapter is like swinging in the mood. Since it’s covering all the new enhancements so the diversity was expected.

You can order your copy from here.

Or you can enter into the contest the Author have announced here to get the FREE copy of the book.

Happy Learning!!

Manually Installing language pack on Windows8

In need of installing a language pack on windows 8 we can easily install the new language pack from the control panel –> Languages. But this requires you to connected to internet to download and install the selected language pack. In this post I’ll tell you how to install the language pack if you have the language pack already downloaded or on some other media.

There’s an wizard to install the languages on Windows8. It can be found under the

C:\Windows\System32\lpksetup.exe

image

Though it uses another utility to install the language packs lpkinstall.exe which is also available in the same directory i.e. System32. This lpkinstall.exe is a command line utility and  can be used to install the language packs in a silent mode.

Now you just need to follow the below steps:

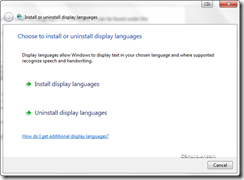
1. Launch the lpksetup.exe. You’ll see the below window asking for install/uninstall of the language pack.

SNAGHTML2bc3bf4e

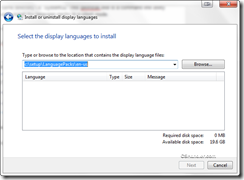
2. Click the Install display languages option and browse the folder that contains your language packs on your local media.

SNAGHTML2bc5fb06

Now click next and install.

And you’re done. Hope this Tips helps those windows users who don’t know that there’s option available to install the language packs offline as well. Good luck :)